It’s not super easy to do this, but it’s also not rocket science, either. All you need is some coffee and focus time. (We believe in you!)
Please note that you can install Google Consent Mode version 2 in different ways, such as via Google Tag Manager, a WordPress plugin , or by inserting the script on your website. However, you can only install one with a proper Consent Management Platform (CMP).
Regardless of how you have implemented Google Consent Mode version 2, the method for checking whether you have implemented the basic or advanced versions is the same.
How to check if you have installed the advanced version of Google Consent Mode version 2?
So, when you begin this “investigation,” you need to keep the following in mind: If you have the basic version installed, it may look like you don’t have Consent Mode v2 installed at all when you look at the so-called network requests.
This means it may look like you “only” have a CMP in place that does its job by the book , meaning it blocks signals to Google when a visitor denies consent and sends them when consent is granted.
Therefore, the first thing you need to do is see if Consent Mode v2 is installed.
Have you installed Consent Mode v2?
To determine whether you have installed Consent Mode v2, open your web page in incognito mode. I will guide you through this using the Chrome web browser.
Right-click on the webpage and select “Inspect.”
Go to the Sources tab and go to scripts and look for the consent mode parameters.
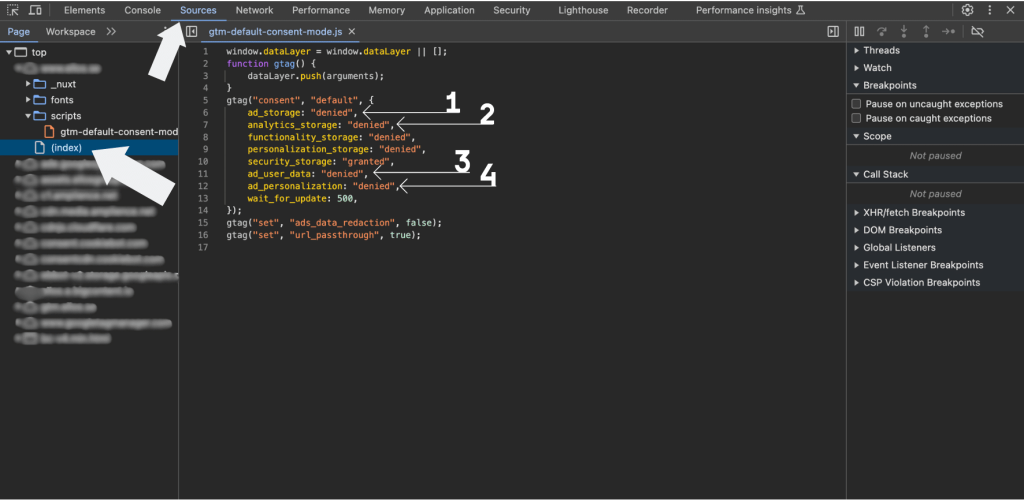
Go to the Sources tab and go to scripts and look for the consent mode parameters.
But how do I know if it’s Google Consent Mode v2 and not the previous version of Google Consent Mode?
The code snippet has fewer parameters if it’s the outdated version of Consent Mode v2; meaning it will only have ad_storage and analytics_storage.
If it’s the updated version of Consent Mode v2, it will have 2 additional parameters, the two at the end here:
ad_storage,analytics_storage,ad_user_data,ad_personalization.
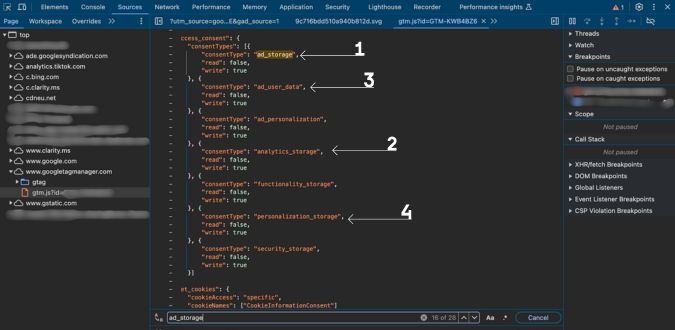
I cannot find the flags, even though I should
If your site does not have data layers, you won’t be able to find the flags as described above; chances are you can then find them in the Google Tag Manager container. To find out, go to (or stay in) the Sources tab and scroll down to find www.googletagmanager.com, and then look for the flags.
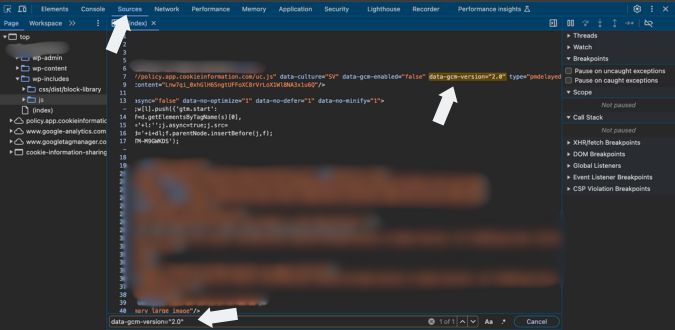
When you have Cookie Information CMP
Also note that if you have installed Cookie Information with our latest Google Consent Mode version 2 integration – where the link to Google’s Business Responsibility site is displayed on the consent banner – then you can verify that you have Consent Mode v2 by searching for (pressing F5 or Command+F on Mac) data-gcm-version= “2.0” in the Sources tab. If it’s there, then you’ve got Consent Mode v2.
Which version of Consent Mode v2 is it then? Basic or advanced?
Now that you know that you have Consent Mode v2 installed, it’s time to see if it’s the basic version or the advanced version.
Follow these 7 steps to get to the bottom of this.
- Open the website
- Launch Google Chrome and navigate to your website in incognito mode.
- Access developer tools
- Right-click on the webpage.
- Select “Inspect” to open
- Chrome developer tools
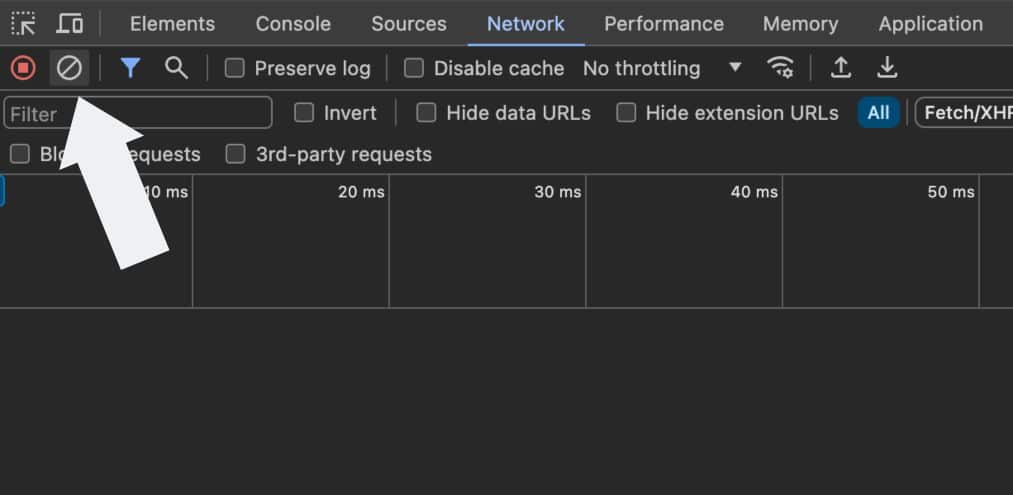
- Go to the Network Tab
- Click on the “Network” tab in the Developer Tools panel.
- If not visible, click the double arrow (>>) to find it.
- Clear existing logs
- Click the circle with a slash icon or right-click in the log area and select “Clear.
- Refresh the page
- Refresh the webpage by pressing F5 or clicking the refresh button.
- Decline cookies (if prompted)
- When the cookie consent prompt appears, choose to decline cookies.
- Monitor network activity
If you, like me, don’t really know what a network request is, here’s how I explain it to myself:
It’s like sending a letter to a friend asking for information. When you visit a website, your computer sends these “letters” to the website’s friend, a.k.a. server, and asks for the pictures, texts, and all the information needed to show the webpage. The server then replies by sending all that information back to your computer so you can see the website as intended.
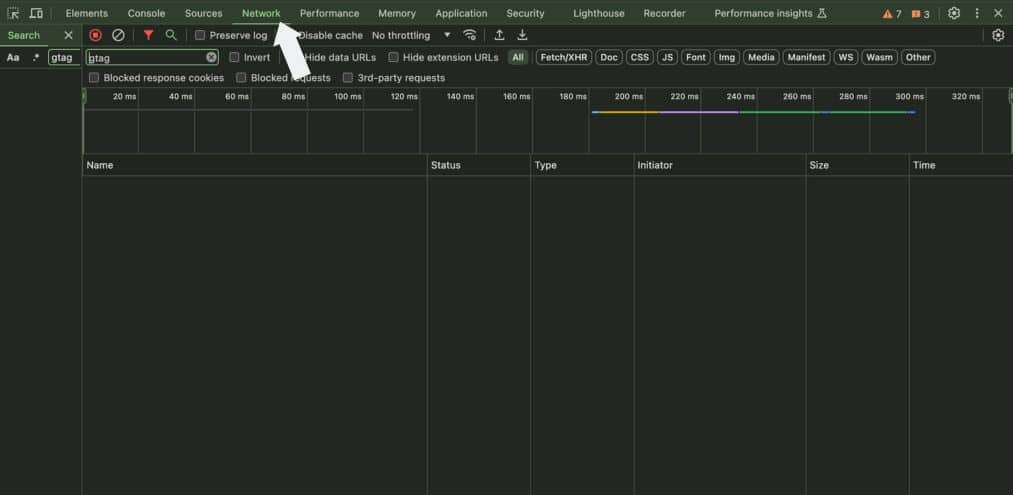
Anyway, you need to look at the tab with all the network requests now. Use the filter box to search for specific requests for Google Analytics or Google Ads. Type keywords like gtag, gtm, analytics, or ads.
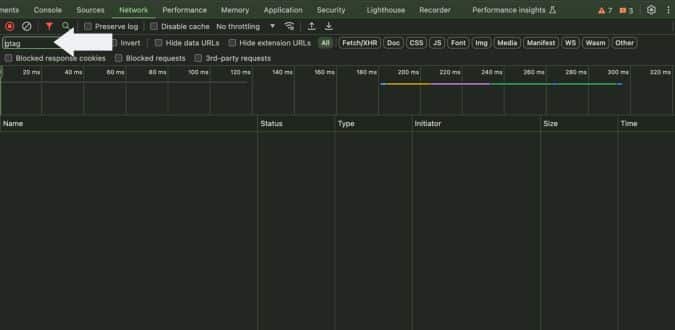
Now look for requests with URLs containing for example google-analytics.com, googletagmanager.com, or googleadsservices.com, or anything that indicates consent mode.
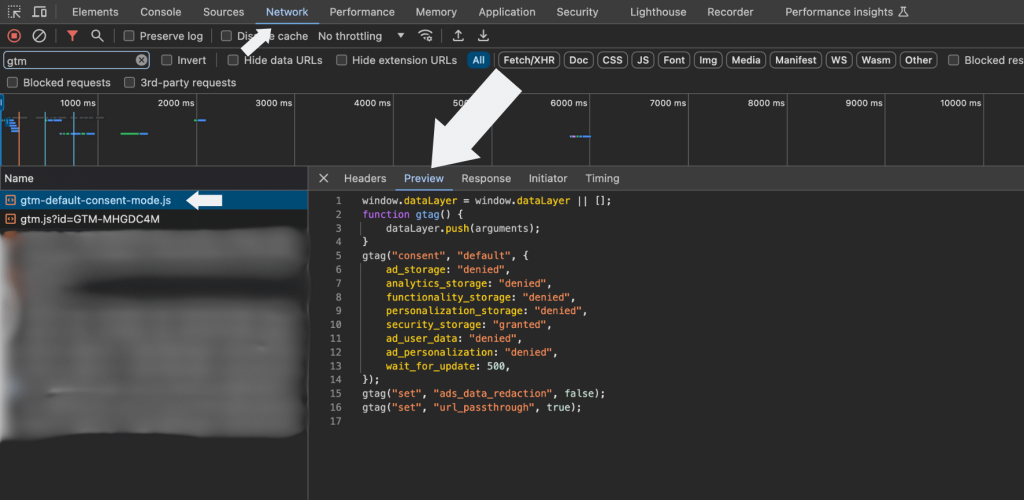
In our example we found gtm-default-consent-mode.js. Click on that and go to the Preview part of the right-window.
Look for these parameters:
ad_storage,
ad_user_data,
ad_personalization,
analytics_storage
If you see them, you have installed an advanced version of Google Consent Mode. If you do not see them, it is most likely the basic version. If you have set it up correctly, they should all be “denied”.
If you click the cookie banner again, press accept, and inspect the parameters again, they should all be set to “granted.”
Summary
First, ensure you have Google Consent Mode v2 by looking for the script via the web browser’s developer tool. If you find it, you can proceed to step 2.
Now look for the so-called network requests for Google Analytics or Google ads. You have the basic version if there are no requests when consent is denied. If all the parameters show up, you have the advanced version.
Also read:
Please also note that, in order to be compliant with Google’s requirements, the first layer of the cookie banner needs to link to Google’s Business Data Responsibility Site.
Now what?
In the world of web development things are seldom super straightforward. Follow up questions will arise. Especially if you can’t find the tags.
But fear not.
We have developed a free tool for you, that automatically checks if you have Google Consent Mode version 2 installed or not. It will take you, at least, half-way!
Frequently asked questions
What is Google Consent Mode version 2?
Google Consent Mode version 2 is an updated mechanism that allows websites to adjust the behavior of Google tags based on user consent choices, ensuring compliance with privacy regulations while maintaining data collection for analytics and advertising.
How can I check if my website has implemented Google Consent Mode version2?
To verify if Consent Mode v2 is active on your website:
- Open your website in an incognito window.
- Right-click on the page and select “Inspect” to open the developer tools.
- Navigate to the “Sources” tab and search for scripts containing consent mode parameters like ad_storage, analytics_storage, ad_user_data, and ad_personalization.
If these parameters are present, Google Consent Mode v2 is likely implemented.
What’s the difference between Basic and Advanced implementations of Google Consent Mode version2?
The Basic version blocks all Google tags until user consent is granted, collecting data only from users who accept cookies. In contrast, the Advanced version implementation loads Google tags before obtaining user consent, allowing the collection of non-identifiable data from users who decline consent, which enhances modeling accuracy.
How can I determine if my website uses the Basic or Advanced version of Consent Mode v2?
To identify which version is implemented:
- Open your website in an incognito window.
- Access the developer tools by right-clicking the page and selecting “Inspect.”
- Go to the “Network” tab and refresh the page.
- Decline the cookie consent when prompted.
- Observe the network activity:
- If Google tags do not fire, the Basic version is in use.
- If Google tags still send cookieless pings, the Advanced version is implemented.
This method helps determine the specific Google Consent Mode v2 version active on your site.
Why is implementing Google Consent Mode version 2 important for my website?
Implementing Consent Mode v2 ensures compliance with evolving privacy regulations and maintains the effectiveness of your analytics and advertising efforts by adapting data collection based on user consent.
Is Google Consent Mode v2 included in the Cookie Information CMP trial?
Absolutely. Google Consent Mode v2 is fully integrated into all our CMP pricing plans, including the free version, at no extra cost. You’ll also find ready-made banner templates and guides for a smooth setup process. Learn more about our cookie banner tool for websites.
How does Consent Mode v2 affect Google Ads and Google Analytics?
Consent Mode v2 ensures that Google Ads and Google Analytics adjust data collection based on user consent preferences. If users decline tracking, Google Analytics will receive cookieless measurement data, and Google Ads can use modeling to fill in gaps, improving ad performance while staying compliant with privacy laws.
Why is Advanced Consent Mode important for Google Ads campaigns?
With Advanced Consent Mode, Google Ads can still gather measurement data even if a user declines tracking. This allows better ad attribution and conversion modeling, ensuring advertisers get valuable insights while respecting cookie consent banner choices.
How do I implement Google Consent Mode to comply with the Digital Markets Act?
To comply with the Digital Markets Act (DMA) and other privacy laws, you should:
Monitor and keep your digital marketing practices up to date with Google’s EU user consent policy.
Use a cookie consent banner to obtain valid user consent. The easiest way to implement one is to install a consent management platform (CMP) like Cookie Information’s cookie banner tool.
Configure Google Consent Mode so that it adjusts Google tags based on user choices.
Ensure analytical data and measurement data are processed only if consent is given.
What’s the difference between measurement data and analytical data in Google Analytics?
Measurement data: Basic tracking information used for ad attribution and conversion modeling. It may be collected in a cookieless way with Advanced Consent Mode.
Analytical data: Broader insights like user behavior, demographics, and engagement, which typically require full cookie consent.
Will my Google Analytics reports be impacted if users decline cookie consent?
Yes. If users reject tracking via the cookie consent banner, Google Analytics will receive limited analytical data. However, with Advanced Consent Mode, Google Analytics can still process measurement data using anonymous pings.
Do I need Advanced Consent Mode to comply with the Digital Markets Act?
While the Digital Markets Act does not mandate Advanced Consent Mode, using it helps balance privacy compliance with data-driven marketing. It ensures your Google Ads and Google Analytics still function effectively while respecting user choices.
How do Google tags work with Basic vs. Advanced Consent Mode?
Basic Consent Mode: Google tags remain blocked until users accept cookies.
Advanced Consent Mode: Google tags send cookieless measurement data, even if users decline cookies, improving analytics and ad attribution.
How can I check if my website correctly implements Google Consent Mode version 2?
You can check by:
- Opening your website in an incognito window.
- Using the developer tools (Inspect → Network tab).
- Looking for Google tags (like gtag.js or gtm.js).
- Declining cookies and checking if cookieless measurement data is still being sent (for Advanced mode).
For a less technical and quicker way, you can also use our free Google Consent Mode v2 checker tool.
What happens to Google Ads conversion tracking if users reject cookies?
Without Advanced Consent Mode, rejected cookies mean missing conversion data. With it, Google Ads can use Google tags to collect cookieless measurement data, helping maintain accurate conversion tracking while complying with privacy regulations.
Can I use Advanced Consent Mode with my current cookie consent banner?
Yes! Many cookie consent banners integrate with Google Consent Mode. Ensure your banner:
- Explicitly asks for consent for analytics and ads.
- Adjusts Google tags dynamically based on user responses.
- Supports both Basic and Advanced Consent Mode settings.
If you’re not sure if your cookie banner tool is compliant with Consent Mode or are experiencing difficulties with its implementation, consider switching to a Google CMP Gold Partner such as Cookie Information’s consent management platform (free trial and free version available).