Google requires you to respect your visitors’ right to privacy and adhere to their EU User Consent Policy.
How?
By not sending them specific data about people who do not want you to do that, i.e., visitors that push “no” on your cookie banner.
Google also wants you to be able to get as much as possible from your Google Analytics and Google Ads accounts. So they first invented Google Consent Mode—and then Google Consent Mode v2. The latter is a big deal since Google has given you until March 2024 to get the updated version.
Or else …
I recommend our article Google Consent Mode v2 for dummies if you want to learn more about Google Consent Mode v2. In the post you’re reading now, we’ll focus on how to get Consent Mode v2 via Google’s Tag Manager.
You can also get a video demo by signing up for this on-demand webinar, where web analytics expert Lars Friis shows you step-by-step how to implement Consent Mode v2 via Google Tag Manager.
Why use a CMP to get Google Consent Mode v2 via GTM?
You can always build your own consent management platform (CMP) solution and then create your own Google Consent Mode v2 tag template.
But one of (the many) benefits of getting an established and certified CMP is that you (also) get that last part “on the house”, i.e., the tag template, without having to write a single piece of code. All you have to do is choose it in the Google Tag Manager (GTM), then go into it and calibrate those default consent states.
Easy peasy.
Or, as Google puts it , “This ensures optimal functioning of Google and third-party tags that support consent mode”.
But note that when you implement Consent Mode v2 via a template in Google Tag Manager, you are implementing the advanced version, not the basic version. More on that at the end of this post.
Step-by-Step guide to setting up GTM Consent Mode v2
For the record, you can also choose to implement Google Consent Mode v2 via a WordPress plugin or by inserting the script directly onto your website. What you choose is up to you and your specific needs.
What you can not do is implement Consent Mode v2 without a Consent Management Platform (a CMP), like, for example, Cookie Information’s CMP or, by all means, your own home-made CMP.
So before you run into your GTM, you have to make sure you have a CMP account, preferably a CMP certified by Google, like, for example, Cookie Information’s CMP. If you don’t have one, it’s easy to fix. Just go here and try one for free for 14 days – no strings attached.
Let’s say you have your CMP account now. Then here’s an overview of what you need to do:
- Go to Google Tag Manager and create a new tag.
- Add Cookie Information’s tag manager template to your workspace.
- Configure your tag settings.
Let’s break down this in more detail.
And take note: With Consent Mode v2, you must use gtag.js or Google Tag Manager. If you have the older tag-versions (like ga.js or analytics.js), you must update to the latest tag version before doing anything else.
Step 1: Accessing the Tag Manager template
First, you must go into your Google Tag Manager account/dashboard and open the Tags menu.
Here, you click “New”.
Make sure you give the “New” tag a name – for example, Google Consent Mode v2 with Cookie Information.
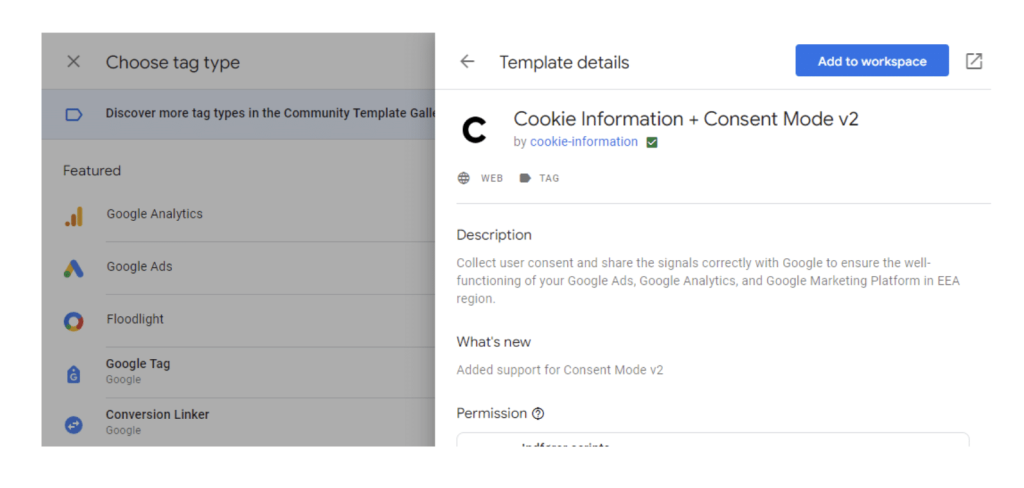
Then click on “Discover more tag types in the community template gallery”. When you get there, search for our tag template “Cookie Information Consent Mode v2”.
All good?
Ok, then select it and click on “Add to Workspace”.
Step 2: Configuring tag settings
Then you go to “Default Settings” and add and adjust each row – meaning consent types – one row for each consent type. All in all, there can be 7 consent types, plus the row for regions/language.
Note that 1 and 3 are the two new tags unique for Consent Mode v2.
Note that 1 and 3 are the two new tags unique for Consent Mode v2.
- ad_personalization (marketing cookies)
- ad_storage (marketing cookies)
- ad_user_data marketing (marketing cookies)
- analytics_storage (statistical cookies)
- funcationality_storage (functional cookies )
- security_storage (necessary cookies)
- personalization_storage (functional cookies)
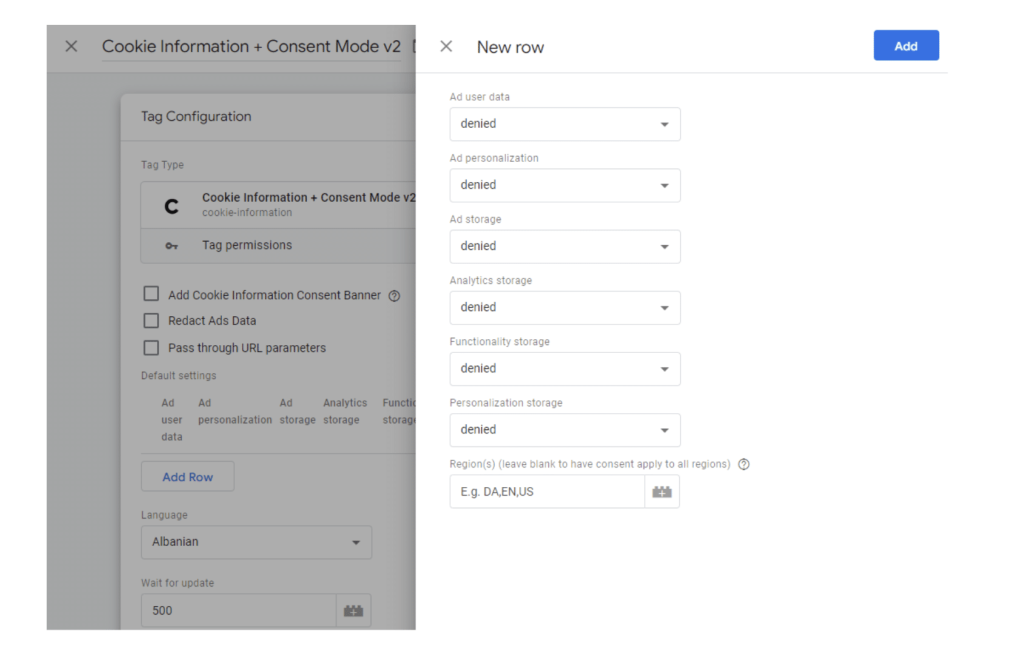
Note that all consent types are set to “denied” per default, meaning they will not be fired before the website visitor has given their consent – i.e., answered yes to that specific cookie category on the consent banner.
Also, note that you can change this default “denied” behavior and add different geographical regions by clicking “Add region” under the “Default Consent State”-section. Some regions may have more lenient privacy regulations, which could allow for that.
If you leave the Region row blank, the consent settings will be the same for every region.
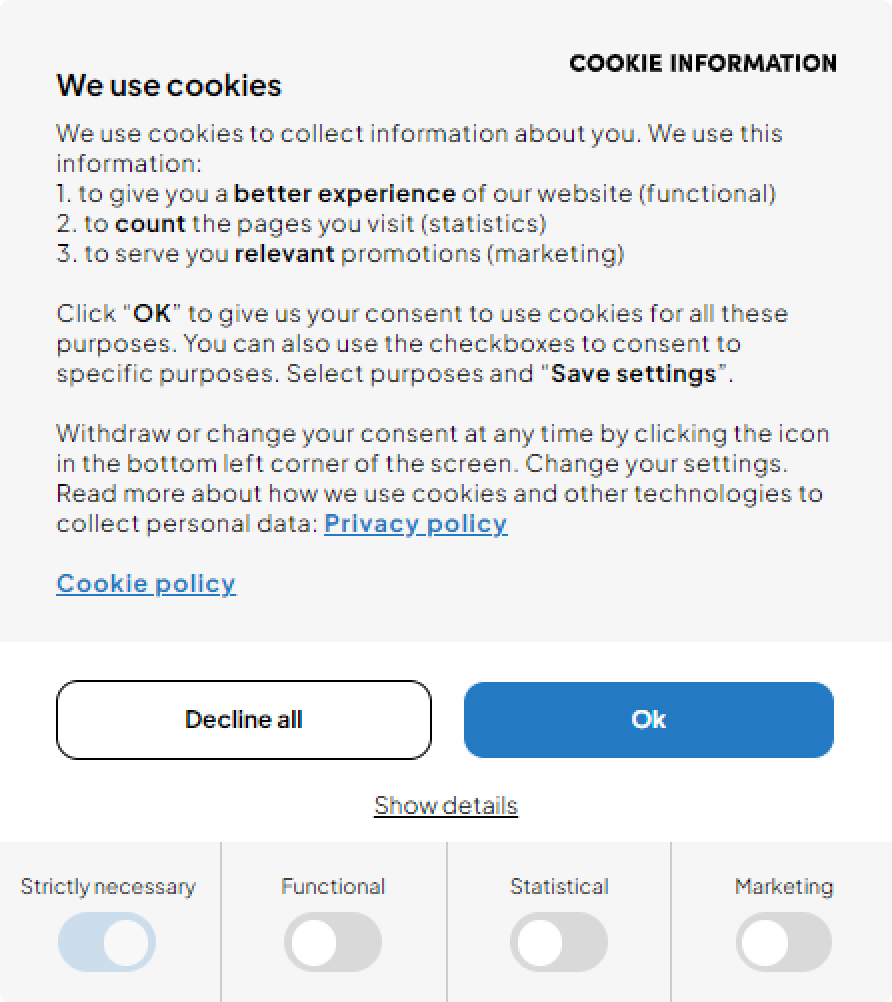
Cookie Information automatically maps the 7 consent types to the 4 different categories in the cookie consent banner that comes with Cookie Information CMP.
- Necessary cookies
- Functional cookies
- Statistical cookies
- Marketing cookies
Advanced vs. Basic mode: choosing the right implementation
Google Consent Mode v2 offers two implementation approaches: Basic and Advanced. Understanding the differences between these modes is crucial for selecting the implementation that best aligns with your website’s compliance and data collection objectives.
Basic Consent Mode: In this mode, Google tags are blocked from firing until the user provides consent. This approach ensures that no data is collected or sent to Google services without explicit user permission, prioritizing user privacy and compliance.
Advanced Consent Mode: This mode allows Google tags to fire immediately upon page load, even before user consent is obtained. However, the behavior of these tags adjusts based on the user’s consent status. If consent is not granted, the tags send anonymized, cookieless pings to Google, facilitating conversion modeling and analytics without compromising user privacy.
When deciding between these modes, consider your organization’s technical capabilities and compliance requirements. The Advanced Mode offers more comprehensive data insights but requires a more sophisticated setup and a thorough understanding of consent management.
Read also:
Basic vs. Advanced Consent Mode v2: what’s the difference between the two GCMv2 implementations?
Should I do something in the Advanced Settings in the GTM set up?
As mentioned before, one of the new aspects of Consent Mode v2 is that you can implement it in an Advanced or Basic Version.
The Basic version blocks the tags entirely before consent. The Advanced version sets them before consent is given. Is the advanced version 100% compliant with privacy regulations? If you’re hesitant, consult your Data Protection Officer (DPO) or a tech lawyer who can help you assess it.
If you choose to implement Google Consent Mode v2 with the Google Tag Manager template, as described here, then you choose to run with the advanced mode.
This is quite important to keep in mind. If you want to implement Consent Mode v2 basic mode, you can do it by inserting the Consent Mode v2-boosted script for your CMP.
So it is easier to go with the basic mode if you feel that that is all you need.
Read more about how to get the basic version in this support article: Set up Google consent mode v2 by updating main installation code. It covers all implementations, so locate the script version when you go in there.
But to just explain it really short, when you get our CMP and know that you only want the basic version, then you implement the smaller CMP script, which has been adapted for Consent Mode v2 by us adding this small string:
data-gcm-version=”2.0″
That’s it.
Ok, sorry for the detour.
Now, all you have to do to get your Consent Mode v2 setup in GTM is select “Advanced Settings”, where you go in and add a time frame for when the tags are set to fire.
Note that “Advanced Settings” does not refer to “advanced mode”, since the entire set up via the GTM is the advanced setup.
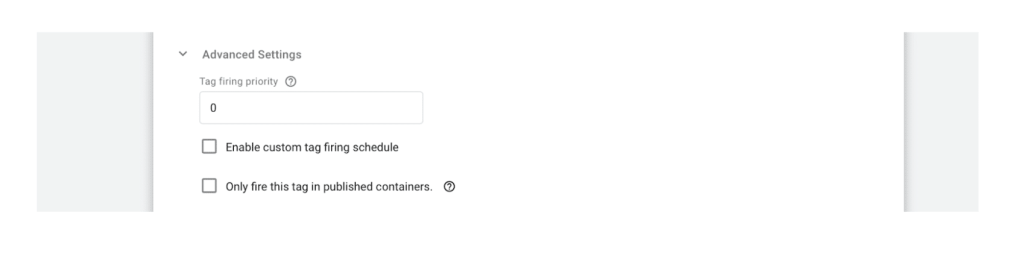
Time is measured in milliseconds, so if you want the tags to fire 1,5 seconds after consent has been given, then you write 15000.
It’s time for consent mode to start rolling after a visitor has said yes to cookies on the banner.
After this is done, you click on the Triggering page”, where you select the triggering type to:
“Consent Initialization”.
Then you save and preview to test your tag.
If everything looks fantastic, you can go ahead and click “Submit”.
And you’re done! Now you can continue to use remarketing, automated bidding strategies, respecting Google’s policies in force since March 2024.
If you want to see our excellent support article, with screenshot images and such, please go here.
Step 3: Implementing the tag on your website
But what about the cookie banner? Will the GTM setup ensure it shows on my website? Yes, you don’t have to go out of the GTM setup to get the actual cookie consent banner up and running on your site.
In the Google Tag Manager, all you have to do is check the box for “Add Cookie Information, Consent Banner.”
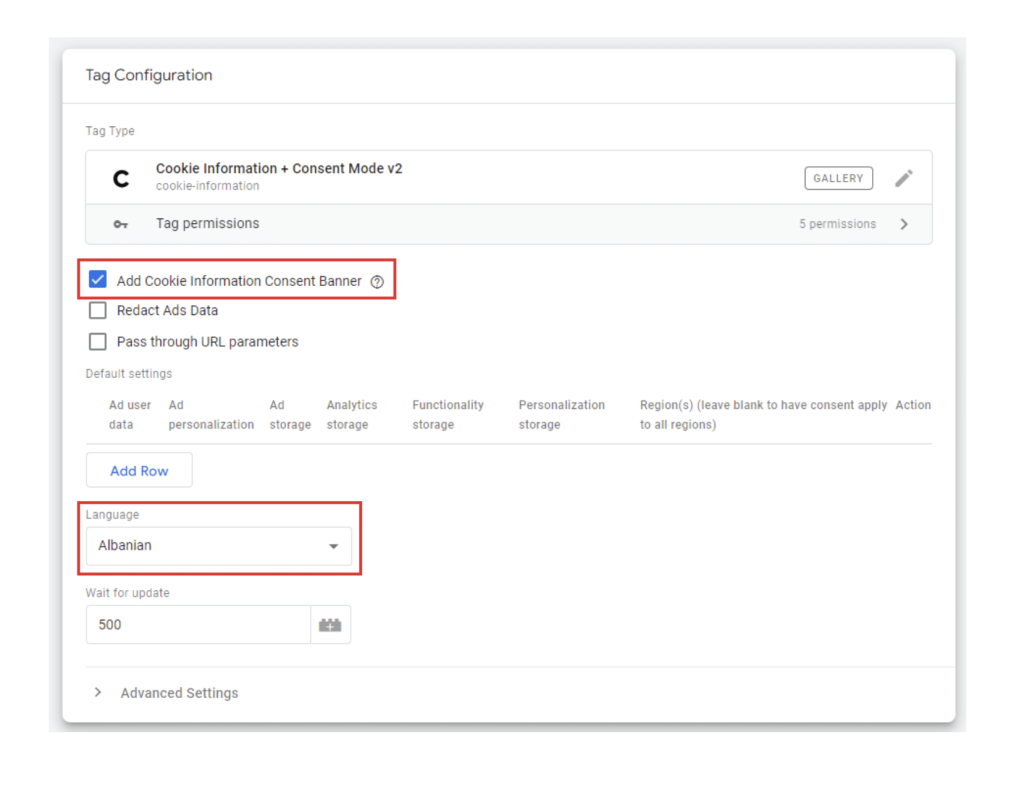
But if you already have the right cookie banner inserted into the source code via the so-called uc.js-snippet, then there is no need to check that box.
Regarding the dropdown menu for language. It controls the language of the cookie consent banner. If you want to change the language dynamically, then do not use this setting. Instead, take a peek at our more comprehensive support article Set up Google consent mode v2 using Google Tag Manager tag template.
What’s the best cookie consent banner?
The right one is “Overlay 2” or the “Overlay 3”.
Check our cookie consent banner template generator and select either one of them to see how they look.
If you, for some reason, want to add the cookie banner template manually, then make sure it has the custom attribution “data-gcm-enabled=false.”
For more details about that, see our support article Set up Google consent mode v2 by updating main installation code.
Best practices and common pitfalls when implementing GTM Consent Mode v2
Best practices
Use a certified CMP: Employ a Google-certified Consent Management Platform (CMP) to streamline the implementation process and ensure compliance.
Regularly update tag configurations: Keep your Google Tag Manager configurations current to accommodate any changes in consent regulations or Google’s policies.
Thorough testing: Before deploying changes, rigorously test your setup in various scenarios to ensure tags behave as expected based on user consent.
Common pitfalls
Neglecting consent synchronization: Failing to synchronize consent states between your CMP and Google Tag Manager can lead to data discrepancies and compliance issues.
Overlooking regional regulations: Different regions may have varying consent requirements. Ensure your implementation accounts for these differences to maintain global compliance.
Insufficient documentation: Lack of detailed documentation can hinder troubleshooting and future updates. Maintain comprehensive records of your consent mode configurations.
The fastest way to get Consent Mode v2 implemented
The fastest way to get the latest version of Consent Mode v2 up and running is with a consent management platform (a CMP), such as Cookie Information’s cookie banner for websites.
Thus, if you do not have an active CMP on your site today, the first thing you need to do before heading to your Google Tag Manager is sign up for one.
We offer a free 14-day trial with no strings attached if you want to get Google Consent Mode v2 up as fast as possible on your WordPress site. Don’t forget Google’s enforcement started in March 2024. so you may be at risk!
Frequently asked questions
What is GTM Consent Mode v2?
GTM Consent Mode v2 is an updated framework by Google that allows website owners to adjust the behavior of Google tags based on user consent preferences, ensuring compliance with privacy regulations while maintaining data collection capabilities.
How does Google Consent Mode v2 differ from the previous version?
Consent Mode v2 introduces additional consent parameters, such as ad_user_data and ad_personalization, providing more granular control over data collection and usage.
Why is implementing Consent Mode v2 important?
Implementing Consent Mode v2 ensures compliance with evolving privacy laws and Google’s EU user consent policy. It enables you to maintain the effectiveness of your advertising and analytics efforts by respecting user consent preferences.
Can I implement Consent Mode v2 without a Consent Management Platform (CMP)?
While it’s possible to implement Consent Mode v2 without a CMP, using a Google-certified CMP simplifies the process and ensures accurate consent collection and management. Cookie Information is Google CMP partner with a Gold status, the highest trust ranking from Google for consent solutions.
What are the consequences of not implementing Consent Mode v2?
Failure to implement Consent Mode v2 may result in non-compliance with Google’s EU user consent policy, potentially leading to reduced functionality in Google Ads and Analytics services, or ultimately even Ads account suspension.
Is Google consent mode v2 included in Cookie Information CMP trial?
Absolutely. Google Consent Mode v2 is fully integrated into all our pricing plans, including the free version, at no extra cost. You’ll also find ready-made cookie consent banner templates and implementation guides for a smooth setup process.
How easy is it to set up Cookie Information’s website cookie banner?
Cookie Information’s Cookie Banner for Websites is straightforward to implement with minimal technical skills. Follow these steps:
- Log in to your Cookie Information account.
- Add your website domain(s) to the Cookie Information CMP platform.
- Insert the cookie banner script into your website’s source code.
- Done. Enjoy using our consent banner tool.
For more details, visit our guides for first-time users with step-by-step instructions.
What are Consent Mode signals in GTM Consent Mode v2?
Consent Mode signals refer to the information passed from a website’s consent management platform (CMP) to Google Tag Manager (GTM). These signals communicate a user’s consent choices, determining how Google tags behave for tracking, advertising, and analytics.
What are the key Consent Mode parameters in GTM Consent Mode v2?
Consent Mode v2 introduces new parameters to provide more granular control over tracking. The key Consent Mode parameters include:
ad_storage– Controls ad-related cookies for remarketing and conversion tracking.analytics_storage– Governs data collection for analytics purposes.ad_user_data– Defines whether Google Ads can use user data for personalized advertising.ad_personalization– Manages personalized ad targeting based on user consent.
These parameters ensure measurement data is collected in a privacy-compliant way while optimizing ad performance.
How does GTM Consent Mode v2 affect measurement data?
When users decline certain cookie categories, measurement data is adjusted accordingly. Instead of blocking all data collection, Consent Mode v2 allows GTM to send cookieless pings to Google services, helping maintain aggregated reporting while respecting user consent preferences. This enables businesses to still gain insights even when direct tracking is limited.
What happens to conversion data if a user doesn’t give consent?
If a user declines consent, GTM Consent Mode v2 does not store cookies for conversion tracking. However, Google uses conversion modeling to estimate missing conversion data based on consented users’ behaviors, helping advertisers track performance while staying compliant.
How does Consent Mode v2 improve data collection in Google Ads and Analytics?
Consent Mode v2 ensures that measurement data is collected in a way that aligns with user preferences. By dynamically adjusting Consent Mode parameters, GTM can:
- Allow Google Analytics to collect aggregated data even when users opt out of cookies.
- Enable Google Ads to use conversion modeling to fill in data gaps for campaign performance.
- Provide Consent Mode signals to help businesses make data-driven decisions without violating privacy laws.
How do I verify if GTM Consent Mode v2 is working correctly?
You can check if Consent Mode signals are correctly passing through GTM by:
- Using Google Tag Assistant to inspect tag firing behavior.
- Checking Google Ads and Analytics for missing or modeled conversion data.
- Reviewing consent states in your CMP logs to ensure proper integration.
Does Consent Mode v2 affect website performance?
No, GTM Consent Mode v2 is designed to optimize tracking without significantly impacting website performance. By dynamically adjusting how measurement data is collected, websites can remain compliant while keeping analytics and advertising efficient and lightweight.
Do I need to update my Google Tag Manager setup for Consent Mode v2?
Yes. If you’re using Consent Mode v1, you’ll need to update your Consent Mode parameters in Google Tag Manager (GTM) to ensure compliance and continue benefiting from improved conversion data modeling.